Pages

Showing posts with label international incident party. Show all posts

Thursday, 28 July 2011

sichuan-inspired dan-dan congee

It has been awhile since I last signed up for one of the always fun, and always challenging International Incident Parties hosted by the lovely Penny at Addictive and Consuming. This month's theme? Sichuan cuisine. Bang!

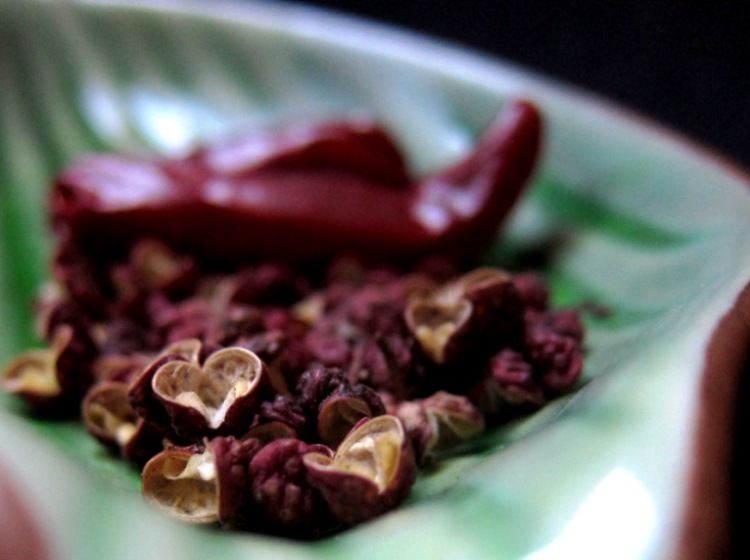
sichuan peppercorns and dried chillies.

I love my food hot, I love it spicy. But I've never attempted to cook Sichuan food. I immediately turned to an impulse purchase I made several months ago - a cookbook by Iron Chef Chen Kenichi, titled Iron Chef Chen's Knockout Chinese. I rarely use cookbooks, and I've never used this one, but who better to take as a guide other than Iron Chef Chen, the sage of Sichuan cuisine?

iron chef chen's knockout chinese!

Iron Chef Chen's Knockout Chinese doesn't actually feature many traditional Sichuan dishes. However, I did find one for dan-dan noodles. I tweaked a few of the ingredients, swapped noodles for rice, and came up with... an Iron-Chef-inspired dan-dan congee.

zha cai (chinese preserved vegetables)

sichuan-inspired, iron-chef-adapted: vegan dan-dan congee (serves 2)

for the congee:

3/4 cup rice
6 cups water

Wash, rinse and drain rice a few times. Bring rice and water to boil in a pot, then simmer, partly covered, for about 45 minutes or until it reaches your ideal texture and consistency. During this time, stir regularly and add more water if necessary.

for the sichuan-style dan-dan congee topping*:

2 tablespoons peanut oil, or other vegetable oil
1 teaspoon Sichuan peppercorns
1 teaspoon finely chopped dried chilli, or chilli flakes
1 teaspoon finely grated ginger
2 tablespoons Chinese sesame paste
2 tablespoons soy sauce (I used a mix of light and dark)
1/2 tablespoon rice vinegar
1 tablespoon finely chopped zha cai (Chinese preserved vegetables) + more to garnish
1 tablespoon finely chopped spring onions (aka scallions) + more to garnish

Heat up peanut oil in a pan, then throw in Sichuan peppercorns, dried chilli and ginger. Let it cook gently for 2 minutes or until ingredients are starting to turn brown and the oil takes on colour and flavour.
Strain the oil, and whisk with the rest of the ingredients until well-combined.
Drizzle onto congee and scatter with more spring onions and preserved vegetables.

*You should be able to find all these ingredients in a comprehensive Asian grocery store. I've never bought zha cai before but I picked up a brand called Yuquan, which comes in a green packet, and I think it worked nicely. If you can't find Chinese sesame paste, you can try mixing 3 parts tahini or peanut butter with 1 part Chinese sesame oil.

I was pleased with the dan-dan sauce - full of sass and flavour, it was a perfect pairing to plain congee. The fragrant Sichuan peppercorns and dried chillies imparted a gently numbing heat; the zha cai was salty and pungent. The nuttiness of the sesame paste was lightly offset by the acidity of the rice vinegar. Everything worked together, and they worked with the congee to create a humble, warmly inviting dish that added a little perk to my day. A satisfying success!

my sichuan-inspired dan-dan congee.

go get your spice on!

Click here to read the rest of the post!

Sunday, 16 January 2011

crispy rice cake + chinese sausage canapes

hot dog inspired mini sandwiches, made with pan-fried eggy crispy rice cakes and steamed lap cheong.

Hot dogs! That's the theme for January's International Incident Party, hosted, as always, by the lovely Jeroxie. It's been quite the messy situation organising myself for this month's party, and I had a few hiccups along the way - but I got something done. It's certainly not the traditional hot dog - more a hot-dog-inspired canapé or pintxo re-interpreted with a strong Chinese twist. I present to you my eggy crispy rice sandwiches with lap cheong!


If you're not familiar with lap cheong, it is a sweet chinese sausage, usually made of pork, and as is typical of Asian goodies, does not seem to have an official or universal English spelling. On my packet, for example, it is spelt "lup chong". Either way, have a look at my photographs and if you see something that looks like those in your local Asian grocery, you should be on the right track. I do recommend that you try these sweet, savoury, fatty bundles of deliciousness: they are fantastic in dishes such as congee and fried rice.

a packet of lap cheong, plus a Lebanese cucumber I forgot to use.

cross section shots of the sweet chinese sausage usually labelled as lap cheong or lup chong.

Since lap cheong goes so well with fried rice, I decided to make eggy, crispy rice cakes to use as mini sandwiches. The concept of these, in some ways, is quite similar to my flourless potato pancake-omelettes, except instead of potatoes, rice is used here, and instead of keeping them soft and fluffy, I pan-fried them till crispy on the outside.

The first thing I did was steam some rice, together with chopped up Chinese chives, red chilli, ginger, salt and pepper. I also steamed the lap cheong. I then mixed the cooked rice with egg. Finally, I assembled the mini sandwiches, which is basically just putting the crispy rice omelette-cakes together with the steamed lap cheong. I had planned to add cucumber for a cool, refreshing contrast, but I forgot. It still turned out well.

chinese chives, red chilli and ginger.

the mixture of steamed rice and egg.

hot dog inspired canapés: crispy rice cakes with lap cheong

From memory, this made about a dozen little canapés.

2/3 cup cooked rice with seasonings of your choice and to your taste (I used chopped Chinese chives, red chilli and ginger, salt and white pepper)
1 large egg
1 medium lap cheong, steamed whole for 10 minutes, then sliced
cucumber slices (my forgotten ingredient!)
oil, for frying

- Lightly beat the egg, then add the seasoned cooked rice and mix well.
- Heat up a little oil in the frying pan and spoon the mixture into the hot pan, frying it like you would an omelette or pancake. Press the mixture down to help it fry faster and hold its shape, and cook on both sides until crispy on the outside.
- Remove the crispy egg-rice omelette-pancake from the pan, and cut into little squares.
- Place the lap cheong onto one crispy rice cake, and top it with another crispy rice cake. Secure with toothpicks. If you want a higher ratio of lap cheong joy, do it open-sandwich-style and omit the crispy rice cake on top. Remember to steam an extra lap cheong in that case!
- If you do use cucumber, you can incorporate them into the mini sandwiches, or serve them on the side.
- Serve immediately, while they are still warm and crispy.

appetizing bite-sized finger food: part sandwich, part pintxo, part canapé.

the hot dog buffet is on!

Click here to read the rest of the post!

Sunday, 19 December 2010

chocolate matcha steamed egg cake


slices of chocolate matcha steamed egg cake

It's International Incident Party time again and for December, the focus is on colour. Yet again, Jeroxie encourages us to run wild with a great theme! My offering for this month isn't quite as creative as my previous ones, I think. Though considering my first idea was a flop, I'm just glad I managed to get something done in time!

I love steamed egg cake and I learnt how to make it from my mum, who also loves it.
As always, the simplicity of the recipe is big drawcard for me. The basic recipe for steamed egg cake is incredibly easy. All you need is (by volume) 1 part flour, 1 part sugar and 1 part eggs. So it would go something like this...

1 cup flour (regular or self-raising, see instructions below)
1 cup sugar
1 cup eggs
oil (for greasing, and optionally, for adding moistness to the cake)

- Beat eggs and sugar until thick, pale and frothy. Due to limited equipment at my apartment, I can't get the eggs done quite as well as I would like, so I use self-raising flour to make up for it.
- Add flour slowly into the egg mixture, then oil (if using), stirring clockwise until smooth.
- Grease any heat-safe receptacle (I used a stainless steel bowl), and pour in the mixture.
- Prepare whatever steaming device you're using. I opted for a rice cooker. Pour in some water, put a stand in it, and switch it to cook mode.
- Once the water starts boiling, put your cake bowl in and close the lid.
- Steaming times vary. I made a regular-sized cake and it took just over 15 minutes. I then made mini cakes and they were done in about 10 minutes. Test by sticking a fork in - if it comes out clean it's ready.

Notes:
1 part sugar is perfect for most people, but neither my mum nor I have a very sweet tooth, and we usually put in a little less than 1 part.
Oil is optional for keeping the cake moist. I actually don't mind a slightly dry touch to this cake and only added about 1/2 teaspoon oil for every egg used. You can add more if you like.


While I like steamed egg cake just as it is, its easy recipe lends itself quite happily to modifications, as long as you don't add too much extra liquid to it. I decided upon chocolate and green tea to add natural colours and flavours to my cake, using cocoa and matcha powder.

I actually made two styles of steamed egg cake that night - a big one with swirly colour effects, and a couple of small ones with block colour effects.

The swirly one was created by mixing the matcha and cocoa powder respectively with a little bit of water, first ladling one of them onto the middle of the cake mixture in the greased bowl, running a fork through it in circles, then adding the other one and doing the same. For this one, I also used some concentrated cherry juice boiled down from mashed fresh cherries, which accounts for the purplish streaks.

the first chocolate matcha steamed egg cake

For the mini cakes, I divided the mix into 3 parts, one plain, one with matcha powder and one with cocoa powder. The plain one goes right into the greased bowls. Then I spoon the other parts delicately on top of the unmodified mixture, green tea on one side, chocolate on the other.

second batch - a duo of mini chocolate matcha steamed egg cakes

Both of the cakes don't look so pretty when they come out, but once you slice them into portions they look much nicer.

a swirly slice of the first chocolate matcha steamed egg cake

cute little slices from the second batch of chocolate matcha steamed egg cakes

The first cake had more subtle flavours entwined together, whereas the second batch had solid, distinctive flavours in each bite. Really, it's a good day when you get to choose from two cakes - the only dilemma being which one to eat first!

more colour crazy folk!

Click here to read the rest of the post!

Sunday, 24 October 2010

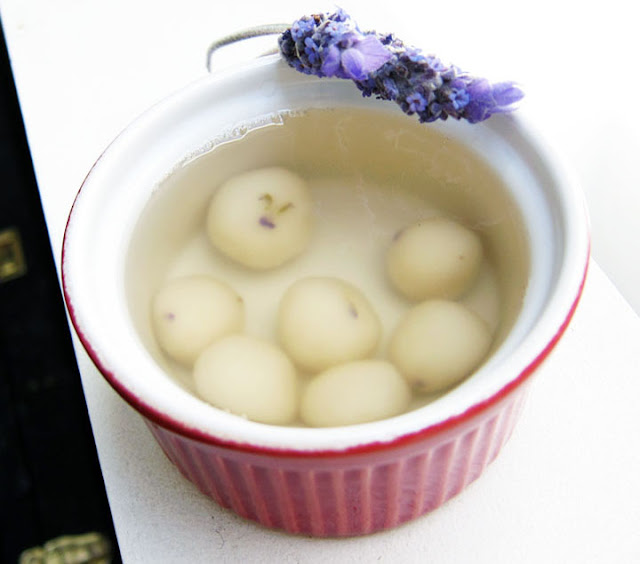
lavender tang yuan

lavender tang yuan
It's International Incident Party time! This food bloggers' challenge is hosted by Jeroxie at Addictive and Consuming, and the theme this month is lavender. I had so much fun with it! In fact, because I had a surplus of lavender at hand, I made two things - lavender cordial, which I posted about last Sunday, and lavender tang yuan, which is my contribution to the party!

So for this special event, my idea was to make tang yuan with a lavender twist. Tang yuan is a Chinese dessert that is traditionally served during the Winter Solstice Festival, but it's not unusual these days to eat them at any time of the year. Basically glutinous rice balls in a sweet and light ginger syrup, it's a dessert I love, and very easy to make.

glutinous rice balls with lavender bits


My original intention was to have lavender-flavoured glutinous rice balls in a ginger syrup, but after doing a test run, I discovered that, unfortunately, regular lavender infusion or cordial is simply not powerful enough to cut through the blandness of glutinous rice. You would need super-sensitive tastebuds, or super-concentrated lavender extract to pull that off! So I settled for having plain glutinous rice balls in a ginger-lavender syrup instead...and it's all good.

To make the sweet ginger-lavender syrup:

water
1/4 cup fresh culinary-grade lavender (or 1 tablespoon dried)
1 piece of ginger, sliced (I used around 2 inches)
sugar, to taste (I usually use raw sugar or Chinese yellow rock sugar)

- Steep the lavender in 1/3 cup freshly boiled water with 1 teaspoon sugar, covered. After about half an hour, strain the liquid. (I rolled the glutinous rice balls and then started on other aspects of the syrup while waiting. If you already have lavender cordial, you can skip this step).
- Bring 3 cups water, ginger slices and your desired amount of sugar to boil in a saucepan, then turn down to a simmer.
- After 20 minutes or when the taste is sufficiently gingery, remove from heat and add the strained lavender infusion (or cordial) to your liking.

To make the glutinous rice balls:

1 cup glutinous rice flour
1/2 cup hot water (As mentioned, I did a test run using lavender water - but it didn't seem to make any discernible difference to the taste, so you can save your lavender and just use plain hot water!)

- Put the flour in a bowl and slowly pour in the hot water.
- Knead until it turns into a soft dough that is neither sticky nor crumbly. Adjust ingredients if you need to, a little at a time.
- Break off small pieces of dough and roll between the palms of your hands to form smooth and round little dumplings about the size of marbles.
- For visual effect, you can poke in bits of lavender as you roll the dumplings. I used the soft bits from the lavender heads that had been steeped in hot water.
- Bring some water to boil in a saucepan, and put the glutinous rice balls in one by one.
- Soon after they float to the surface, drain and serve in the sweet ginger-lavender syrup. You can serve it hot or cold - I think I prefer it hot.

tang yuan with a lavender twist
The lavender and ginger married happily in this creation, the spicy floral flavour complementing the glutinous rice balls nicely. It's cute and just a little different to the regular tang yuan. After making this, I suddenly had another idea - too late - of stuffing the glutinous rice balls with lavender jam or jelly. I'm thinking that could be pretty awesome! But it would also be a lot more work, and right now, I'm all lavender-ed out. Another time, perhaps!


Click here to read the rest of the post!