Pages

Showing posts with label cheese. Show all posts

Thursday, 8 September 2011

strawberry paste... strawberry candy.

soft and chewy strawberry jelly candy.

Don't you just love it when you try to make something and you mess it up - only to gain a fabulous final product anyway?

It was a sunny Saturday afternoon when I made this. I had visions of a silky strawberry butter - similar to strawberry jam, but with a texture so soft and smooth and velvety that you'd want to drown in it. Death by strawberry butter. Yes.

cooking them strawberries with sugar.

Well! That didn't happen. I cooked it too much, for too long, so instead of a dreamy strawberry butter, I got strawberry paste instead. A strawberry paste so firmly set, you might call it strawberry cheese.

But guess what? I like it. Look, I can slice it up and serve it with brie and crackers! I can cut it into pieces, roll it in sugar and transform it into soft, chewy strawberry jelly candy!

And guess what. All you need is three ingredients. Strawberries. Sugar. Lime juice. That's it. No pectin, no gelatine. How good is that?
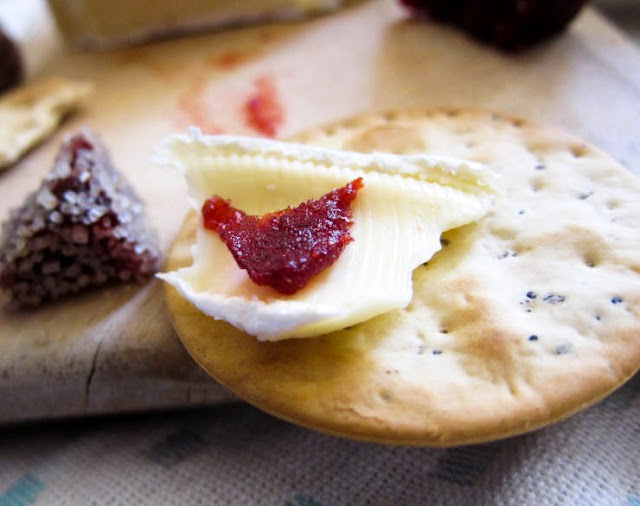
life is good with strawberries, brie and crackers...

strawberry paste / strawberry pâtes de fruits (strawberry candies)
(makes one small block of strawberry paste or two dozen strawberry candies)


1 punnet strawberries (250g / 1/2 lb)
1/2 cup raw sugar
2 tablespoons freshly squeezed lime juice

Hull and halve strawberries.
Cook over a medium low heat with sugar for 10 minutes until soft and juices released. Blend till completely smooth.
Return to saucepan and continue cooking for 20 - 30 minutes or until very thick and goopy. Check on it often, stirring so that it doesn't burn at the bottom.
Add lime juice and bring to a boil for a 10 seconds, stirring, then turn down the heat and simmer for another 10 - 15 minutes.
Times may vary, but the mixture should be a deep red colour, the texture dense and sticky. It should start moving in towards the centre of the pan, cling to a spoon (sliding off slowly and reluctantly) and form a clean, distinct line at the bottom of the pan when you scrape across with the spoon. Bring the mixture to boil for a few seconds occasionally to speed up the process.
Pour or scoop into a small tray, mould or other suitable container. Keep it in the refrigerator until set.

When the strawberry paste has set, and you would like to serve it, turn it out.
Cut into thin slices to serve with cheese and crackers. It'll go well with a mature brie, parmesan or cheddar.

Alternatively, cut into pieces and roll in sugar to create strawberry pâtes de fruits - i.e., strawberry jelly candies. I used raw sugar, which gave it a rough appearance and a crunchy texture. Use a finer sugar to achieve a more delicate quality.

I didn't actually get around to retrieving this from the fridge and trying it out until two weeks later. I was pretty excited by then.

So I had it with brie and cracked pepper crackers for lunch...

a dab of strawberry paste, a dab of brie and a cracked black pepper cracker.

And finished off with a dessert of strawberry pâtes de fruits.

strawberry pâtes de fruits, or strawberry jubes.

Life is sweet. Strawberry sweet.

Click here to read the rest of the post!

Thursday, 9 June 2011

flourless almond mandarin ricotta cake

Winter has arrived in Melbourne, and what better way to celebrate it than with cheesecake? But not just any cheesecake. A light yet soothing gluten-free mandarin ricotta cheesecake, studded with almond slivers, perfect as an almost-guilt-free treat with a hot cup of tea on a lazy afternoon. Alternatively, you may prefer the indulgent route, and have it with stewed fruit and fresh cream or ice cream, perhaps with the finishing touch of a drizzle of honey or syrup...

baked almond and mandarin ricotta cake.

Alright, so some of my almonds look almost a little too brown, and some of my cake didn't quite extricate itself completely from the bottom of the loaf pan. No matter. It was still delicious, and I can assure you that this is a great dessert option if you're looking for something that's relatively healthy and not too heavy. The crumbly baked ricotta, infused with the delicate citrus perfume of mandarins and laced throughout with the nutty, aromatic crunch of toasted almonds is quite a delight. If you're keen on a richer version, I would suggest that you could experiment by adding a little butter or cream to the mix.

sweet, sweet ricotta: fruity, nutty, and ready to be baked in the oven...

mini flourless almond mandarin ricotta cake
(mini loaf pan dimensions: 18cm (l) x 10cm (w) x 5.5cm (h) exterior, 15 x 8 x 5.5cm interior.)
(serves 2 - 4)


1 cup ricotta (approx. 250g or a little less), drained of excess liquid
1 large to extra large egg (55 - 65g)
1 very small and preferably organic mandarin (approx. 5 cms/2 inches in diameter)
1/4 cup raw sugar
1/4 cup slivered almonds
a pinch of salt
oil or butter, for greasing/brushing

Toast slivered almonds by dry-frying them in a pan till golden brown, moving them around frequently to prevent them from burning. Set aside.

Preheat oven to 180°C/350°F fan forced (or 200°C/390°F normal).

Prepare a petite loaf pan by brushing the inside with oil or melted butter. You may also use ramekins or a mini cake pan, and I dare say it could work with cupcake or muffin trays as well.

Peel the mandarin and remove any seeds. Blend or process egg, mandarin peel, mandarin flesh, sugar and salt, then add to ricotta and combine well. Stir in toasted almond slivers. Pour into the greased loaf pan and smooth the surface of the mixture with the back of a spoon.

Bake in the oven for 50 minutes or until golden brown on top and firm to the touch. Let it cool for 10 minutes and then turn the loaf pan over onto a plate or chopping board. Tap it to release the baked ricotta cake.

Slice and serve immediately, or store in an airtight container. If for some ridiculous reason you can't devour this lovely flourless cake the same day you make it, it will keep in the fridge for a few days.

I particularly adore this ricotta cake when it's still warm and moist after emerging from the oven, though it also tends to be more fragile at this time. But honestly, do I really care if my freshly baked ricotta falls apart a little when I'm shoving it into my mouth? No. I'm too busy shoving it into my mouth...

warm, freshly baked mandarin almond ricotta cake, sliced and ready to be consumed.

Click here to read the rest of the post!

Sunday, 1 May 2011

balsamic portobello mushroom burger with bocconcini cheese, fried egg, lettuce and tomato

Why, hello, handsome.

I know there are plenty of you out there who simply refuse to believe in vegetarian burgers. But just bear with me for a moment. As a huge mushroom enthusiast, I want to share my joy with you in regards to my unprecedented mushroom burger success this weekend.

Portobello mushrooms. Also known as portabella mushrooms or field mushrooms. And very delicious.

The burger I am about to introduce is a juicy, sexy ol' hunk of mushroomy goodness, dewy with a lush balsamic vinegar dressing that winks with the piquancy of crushed garlic, shallot and herbs. The bocconcini exudes a creamy self-assurance, while the fried egg brings a little attitude. And ever so reliably, lettuce, tomato and crusty bread brings the whole package together. Yes. Yes, I think I'm in love.

Portobello mushroom marinating in a tangy dressing made with balsamic vinegar, olive oil, garlic and shallot.

balsamic portobello mushroom and bocconcini burger with fried egg, lettuce and tomato (makes 2)

2 large field/portobello mushrooms, stems trimmed
2 tablespoons balsamic vinegar
1 tablespoon olive oil
1 clove garlic, chopped
1 shallot, chopped
8 baby bocconcini or 2 regular bocconcini, thickly sliced (may be substituted with other melting cheese)
a few lettuce leaves (I used green oak lettuce; spinach or rocket/arugula will also work well)
a few tomato slices
sea salt, black pepper and dried or fresh herbs (e.g. parsley, thyme, etc.) to taste
2 eggs
4 slices of toasted crusty bread

- Combine garlic, shallot, balsamic vinegar, olive oil and a liberal pinch each of sea salt, black pepper and herbs in a mortar. Grind, pound and mix well with the pestle to create a marinade and brush or drizzle this mixture generously over the portobello mushrooms. Let it sit for 15 minutes.
- In a bowl, toss lettuce leaves and tomato together in any leftover marinade and set aside.
- Preheat the oven to 180°C/360°F fan-forced (200°C/390°F conventional).
- Place the marinated portobello mushrooms gills side up in the oven and bake for 10-15 minutes.
- While you wait for the mushrooms to cook, fry the eggs to your liking, keeping each one separate, and season with salt and pepper to taste.
- Scatter bocconcini slices on top of the mushrooms and bake for another 3 minutes or until the cheese is just melted. Retrieve mushrooms from oven.
- To assemble each burger, layer lettuce leaves, one mushroom (cheese side up), a slice or two of tomato, one fried egg and more lettuce on a piece of bread, and top off with another piece of bread.
- Enjoy with wild abandon, casting aside all unreasonable thoughts of maintaining any sense of decorum.

Bocconcini mushroom burger with fried egg, lettuce and tomato.

Click here to read the rest of the post!

Thursday, 25 November 2010

cauliflower gouda layered baked eggs with tomato and spinach

I first discovered and fell in love with baked eggs last winter, and during those cold months I visited cafe after cafe on the weekends, sampling the myriad of baked egg offerings out there for breakfast and brunch. In the midst of this intense affair, I vowed to make my own baked eggs one day, but it was only recently that this promise was finally consummated. Was it good? You betcha!

I sigh in bliss, for thou art my lovely baked eggs.

A quick aside on how this baked egg recipe came about. A friend introduced me to the delicious gouda some years ago, and it's been one of my favourite cheeses since then. I really wanted to incorporate it into my baked eggs, so I designed a recipe doing just that. What I like about this recipe is that everything is cooked using just the ramekins and the oven, a tribute to my laziness. No separate sautéing of ingredients in pans, no boiling in pots, etcetera, meaning less dishes to wash!

oh my gouda! I worship you with my tummy.

The following are the ingredients I used. The amounts I leave up to you. You might prefer more of one ingredient than another, so create as you wish!

amazing baked eggs layered with cauliflower, cherry tomatoes, gouda, and spinach

Cauliflower, pinch off small florets to use
Cherry tomatoes, halved or quartered
Gouda cheese, sliced (I used a mild Dutch gouda. You may substitute with other melting cheese.)
Garlic, finely chopped or crushed
Spinach leaves
Eggs
Olive oil
Salt and spices (I used Spanish hot smoked paprika)

- Preheat oven to 180C/350F. (I use fan-forced.)

- Create a mixture with extra virgin olive oil, spices and salt.

- Lightly toss the cauliflower florets and cherry tomatoes in the spiced olive oil mixture. Reserve the remaining olive oil mixture for drizzling later.

- Fill ramekins (or small baking dish) with the cauliflower and tomatoes - I filled mine up close to half-full. Place ramekins in oven for approximately 15 minutes or until cauliflower florets are just slightly charred at the tips.

- Remove from oven, and layer with sliced gouda cheese. Then layer with spinach leaves. Try to tuck them so they don't flop around. Otherwise, you may choose to weigh them down a little with more cheese. I didn't, but it's hard to go wrong with more cheese.

- Crack the eggs gently over the spinach leaves. For the small ramekins I used one egg, for the medium ones I used two. At this point I drizzled over some of the remaining spiced olive oil mixture but you can also do that just before serving. If you love the fruity taste of extra virgin olive oil, do this later.

- Bake until eggs are cooked to your liking. For runny eggs take them out at 10 minutes or even earlier. If you prefer them fully cooked, it may take up to 15 minutes. Mine was somewhere in between – cooked on the outermost part, with a bit of liquid gold right in the centre.

- Now they are ready to eat! If you want, you can top it with more fresh spinach and cherry tomatoes, herbs, and lemon juice to lighten it up.

a simple step-by-step picture guide!

step 1: toss cauliflower and tomato in seasonings, bake in oven.
step 2: retrieve roasted cauliflower and tomato from oven.
step 3: layer with cheese.
step 4: layer with spinach leaves.
step 5: crack eggs gently over the spinach leaves.
step 6: season further (if you like - or wait to do it just before serving), put back into the oven.

Notes:
The ramekins and its contents will be very hot after you take them out from the oven, be careful! Also, remember that the eggs will continue to cook in the residual heat of the dish.
Some ovens have their little quirks. I’m still getting acquainted to the one I use. My times are an estimate so you might need to experiment a little to get your baked eggs just the way you like.

For a first attempt, I was delighted with how well this turned out! Though I give props to my gouda, I wouldn't say there was a singular element that was the star of this dish - the ingredients worked as a team, the layers all coming together to a scrumptious final product. I had my baked eggs with a nice cold glass of fruit juice - a suitably refreshing complement to this warm, comforting dish. What a great start to the weekend!

the final and crucial step for baked eggs: eating them.

Click here to read the rest of the post!

Friday, 24 September 2010

pão de queijo: brazilian cheese bread

pao de queijo
I have mentioned before that I have a fondness for South American stuff, and it's because I train capoeira, which is a Brazilian martial art. I have wanted to make something Brazilian for a few months now and finally stopped procrastinating recently with a venture into pão de queijo, a Brazilian cheese bread, simply because it seemed like it would be pretty easy. So I made some last week, using a recipe I found online and halving it, but it wasn't quite as easy as I thought - even though I followed the recipe, the mixture was too fluid and impossible to knead - I ended up pouring them into moulds to bake. The feedback was still great, but I wanted to see if I could do it better a second time.

I gave it another go this week with some adaptations based on my first try, and with the benefit of experience, it was a success! The first time I made it, I added tapioca starch to the liquid mixture. This time, I did it the other way round and gradually poured the liquid into the tapioca starch (this tip is thanks to the recipe from a book called Street Cafe Brazil by Michael Bateman), and stopped once I got the texture I wanted. As always, the recipe is just a guide. Feel free to individually adjust the amounts of each item during the process to achieve a dough you can work with. My end result was soft, but still workable.

my little golf-ball-sized creations: pao de queijo in the oven

Ingredients:
1/2 cup water
1/2 cup milk
1/4 cup oil (I used rice bran oil)
1/2 teaspoon salt
225g / 1/2lb tapioca starch (also known as manioc starch, cassava starch etc)
1 egg
100g / 1/4lb finely grated parmesan (or similar) cheese

- In a saucepan, combine milk, water, oil, salt and bring to boil.
- Remove pan from heat and slowly pour the liquid on to the tapioca in a bowl while stirring it with a wooden spoon to a dough texture. (You may not need all the liquid mixture - stop pouring if the dough starts to become too soft and moist.)
- Stir in the egg, and lastly, the cheese.
- Grease hands, knead and make approximately a dozen little balls - mine were about the size of golf balls or a bit larger. (I had to shape rather than roll mine because my mix, while not liquid, was still quite mushy - and as you can see they're more like little lumps. They did end up puffing up nicely in the oven though!)
- Arrange on a greased baking tray, leaving enough space between each ball for expanding. Bake in an oven that has been preheated at 200°C (392ºF) for 20 minutes or till they transform into golden puffs.
- Best served hot or warm.

fresh pao de queijo after i bit into it. the interior is sticky when it's still warm, and more bread-like after it cools down.


And there you have it. A nice little batch of pao de queijo with crispy crusts that concede gratifyingly into a warm, chewy softness as you sink your teeth into them. Mm-mmm!

Note: Not having had the ones from Brazil, I'm not sure if these are true to the original, but I'm really satisfied with this batch and Simon loved them, eating about five in quick succession. So I'm putting this down as a triumph!

Update: My capoeira instructor, a Brazilian, has eaten my day-old pao de queijo and given me his high-five of approval. Yay!!


Click here to read the rest of the post!